
Prerequisites:
- Have azure cli installed and configured on your local
- Install Docker Desktop on your local (should be up and running)
Restart your computer if asked by Windows
Step 1: Prepare Your Flask Application
Create a new project, for e.g: dockerImageExample
Create a new Python file app.py in the project
# app.py

from flask import Flask

app = Flask(__name__)

@app.route("/")
def hello_world():
    return "<p>Hello, World!</p>"
Create a new file, requirements.txt, to store the project requirements.
Copy/Paste the following or use the command: pip freeze > requirements.txt
blinker==1.9.0
click==8.1.7
Flask==3.1.0
importlib_metadata==8.5.0
itsdangerous==2.2.0
Jinja2==3.1.4
MarkupSafe==3.0.2
Werkzeug==3.1.3
zipp==3.21.0
Create a new file called Dockerfile in the local directory.
# Use an official Python runtime as a parent image
FROM --platform=linux/amd64 python:3.10 AS build

# Set the working directory inside the container
WORKDIR /app

# Copy the current directory contents into the container at /app
COPY . /app

# Install the necessary Python packages from requirements.txt
RUN pip install --no-cache-dir -r requirements.txt

# Expose the port that Flask will run on
EXPOSE 8080

# Define environment variable to specify Flask should run in production mode
ENV FLASK_APP=app.py
ENV FLASK_ENV=production

# Set the command to run the Flask app
ENTRYPOINT ["python3", "-m", "flask", "run", "--host=0.0.0.0", "--port=8080"]
Step 2: Build and Test the Docker Image
Build the Docker Image:
docker build -t flask-example --platform=linux/amd64 --no-cache . Run the Docker Image Locally to Test
docker run -p 5000:5000 flask-example:latestOpen your browser and navigate to http://localhost:5000 to confirm it works.
Step 3: Push the Docker Image to a Container Registry
Push to Azure Container Registry
1) Create an Azure Container Registry (ACR):
Please only use lowercase alphanumeric characters for the name of the container registry and find a unique name which might not be already been created by someone else.
az acr create --resource-group example-rg --name upmycontainerregistry --sku Basic2) Keep the url of the container registry somewhere for later
Login to the ACR
az acr login --name upmycontainerregistryYou should get “Login Succeeded” if your credentials are valid.
3) Tag and Push the Image
Replace <ACR_LOGIN_SERVER> with the login server URL of your ACR (e.g., mycontainerregistry.azurecr.io):
docker image tag flask-example upmycontainerregistry.azurecr.io/flask-example

docker build -t upmycontainerregistry.azurecr.io/flask-example --platform=linux/amd64 --no-cache .
Step 4: Deploy the Docker Image to Azure App Service
1) Create an App Service Plan
az appservice plan create --name MyAppServicePlan --resource-group example-rg --is-linux --sku B12) Create a Web App for Containers: For ACR:
az webapp create --resource-group example-rg --plan MyAppServicePlan --name FlaskExampleApp --deployment-container-image-name upmycontainerregistry.azurecr.io/flask-example:latest3) Configure App Settings (Optional): Set environment variables
az webapp config appsettings set --resource-group MyResourceGroup --name MyFlaskApp --settings WEBSITES_PORT=8080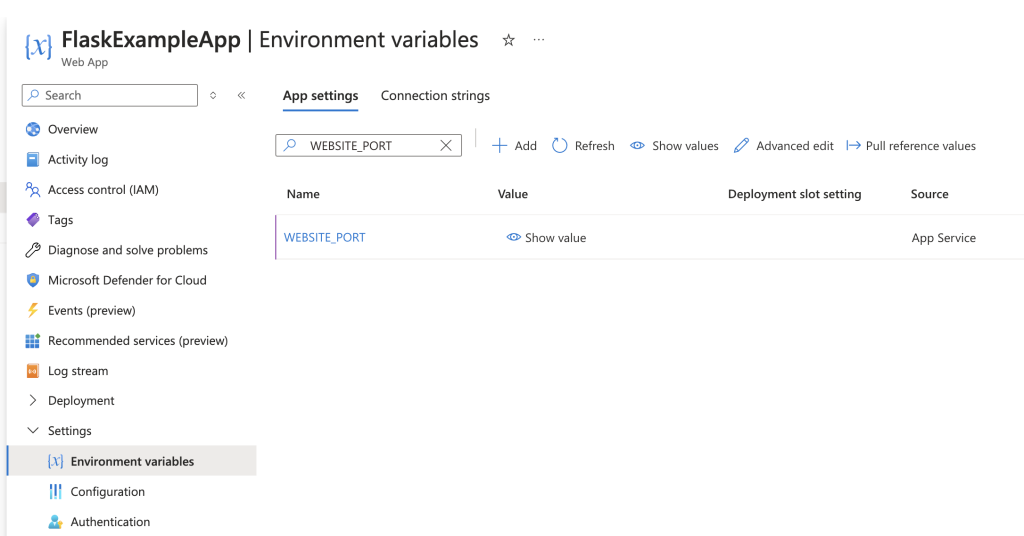
From the search bar, find the container registry you created and Go in Settings and Access Keys.
Then, click on Admin user.
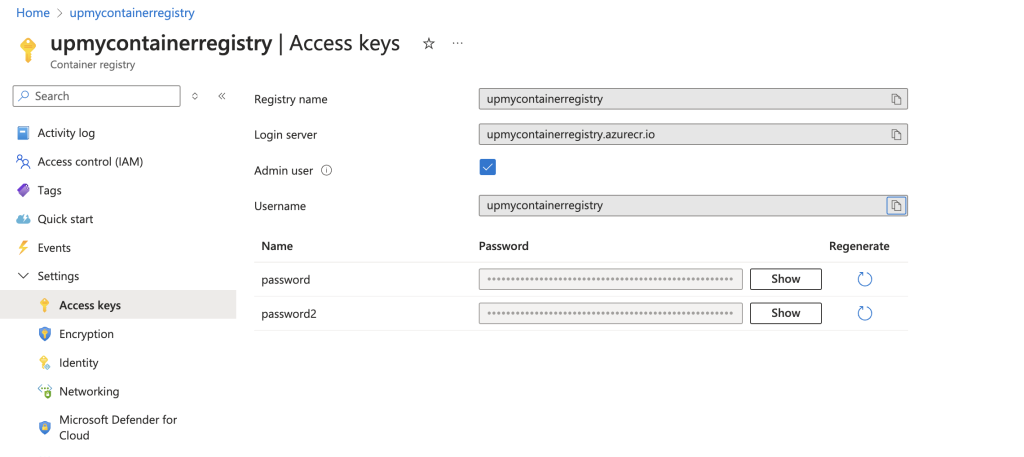
Keep this tab open we will to copy those credentials later in the process.
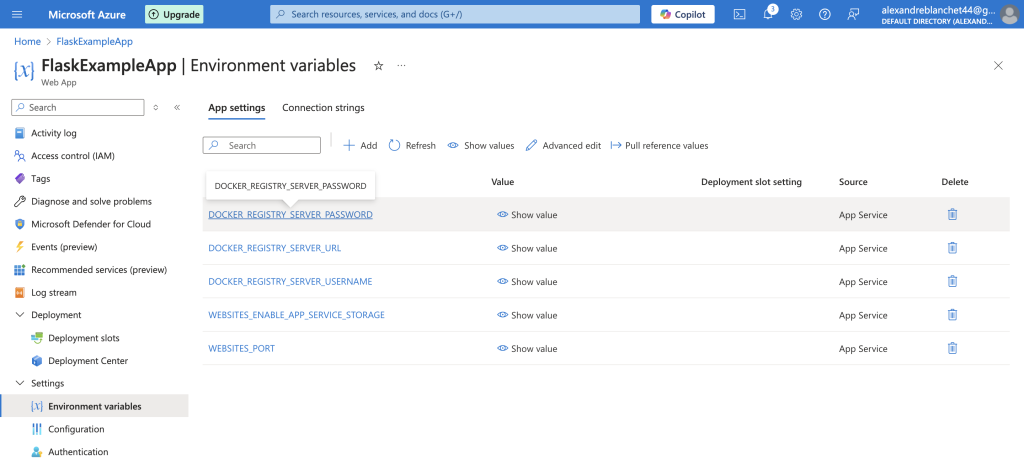
Authenticate to Container Registry to pull Image from FlaskExampleApp
Go on the App Service you created and then go in Settings -> Environment Variables
To allow The App Service to pull the docker image we need to add the following environment variables
- DOCKER_REGISTRY_SERVER_PASSWORD: Copy the password1 value from the Docker Container Registry settings page
- DOCKER_REGISTRY_SERVER_USERNAME: Copy the username value from the Docker Container Registry settings page
- WEBSITES_PORT: 8080 – 80 (outside) is redirected to 8080 (app service) by default
Finally go back in Your App Service -> Overview and Click on Networking bottom-right
Click on View my access and tick “Enable all for public access”
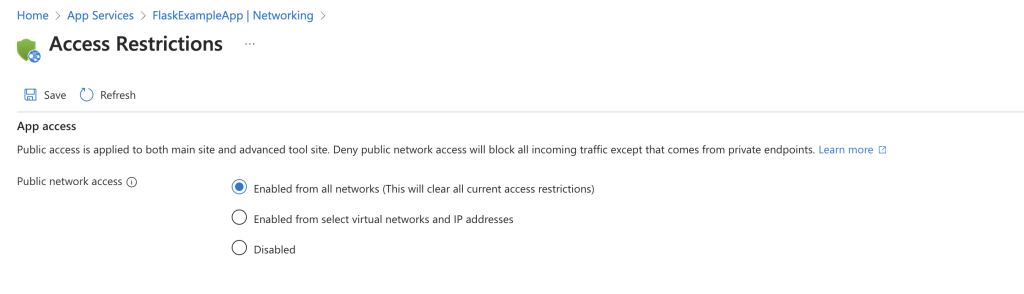
Then Confirm and wait a few seconds.
Step 5: Verify the Deployment
- Navigate to the App URL provided by Azure:
http://<MyFlaskApp>.azurewebsites.net - Check logs if you encounter issues
az webapp log tail --resource-group MyResourceGroup --name MyFlaskAppIf you arrived there Congratulations!! That’s the end of this tutorial. Next time, we will speak about doing those steps via terraform directly!
Sources:
- https://learn.microsoft.com/en-us/troubleshoot/azure/azure-container-registry/authentication-required
- https://learn.microsoft.com/en-us/azure/app-service/reference-app-settings?tabs=kudu%2Cdotnet

Early in my career, I specialized in the Python language. Python has been a constant in my professional life for over 10 years now. In 2018, I moved to London where I worked at companies of various sizes as a Python developer for five years. In parallel, I developed my activity as a Mentor, to which I now dedicate myself full-time.