Through a mini project where we’ll arrange boxes in a container, we’ll explore VPython — a tool that allows you to easily generate a 3D scene from Python, viewable on a web page.
Installing VPython
pip install vpython
pip install vpython --upgrade
Today’s Objective:
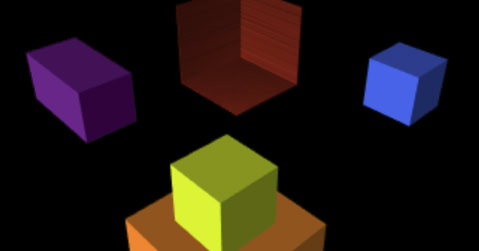
We will create a scene where geometric shapes are arranged into a container when the user clicks.
Container
To make the arranged pieces more visible, I chose to create the container using 2D geometric shapes that are extruded.
Floor
Let’s create the floor with the following code:
from vpython import shapes, extrusion, color, vector, textures

def floor():
    rect = shapes.rectangle(width=1, height=1)
    ex = extrusion(
        path=[vector(0, 0, 0), vector(0, 0.01, 0)],
        shape=rect,
        color=color.red,
        texture=textures.stucco
    )
Left Face
Let’s create the left face with the following code:
def leftface():
    rect_side = shapes.rectangle(width=1, height=0.01)
    ex2 = extrusion(
        path=[vector(0, 0, 0), vector(0, 1, 0)],
        shape=rect_side,
        color=color.red,
        texture=textures.stucco
    )
    ex2.pos = vector(-0.5, 0.5, 0)
Front Face
Let’s create the front face with the following code:
def frontface():
    rect_side_2 = shapes.rectangle(width=0.01, height=1)
    ex3 = extrusion(
        path=[vector(0, 0, 0), vector(0, 1, 0)],
        shape=rect_side_2,
        color=color.red,
        texture=textures.stucco
    )
    ex3.pos = vector(0, 0.5, -0.5)
Boxes to Arrange
Orange Box
orangebox = box(color=color.orange, height=0.5)
Purple Box
purplebox = box(color=color.purple, height=0.5, width=0.5, length=1)
Blue Box
bluebox = box(color=color.blue, height=0.5, width=0.5, length=0.5)
Yellow Box
yellowbox = box(
    color=color.yellow,
    height=0.5,
    width=0.5,
    length=0.5
)
Positioning the Boxes
Now we create a procedure to initialize the position of the boxes:
def init_boxes_position():
    orangebox.pos = vector(2, 0.25, 2)
    purplebox.pos = vector(0, 0.75, 2.25)
    yellowbox.pos = vector(1.75, 0.75, 1.75)
    bluebox.pos = vector(2.25, 0.75, -0.25)
Arranging the Boxes on Click
To arrange the boxes when clicking in the window, we create a procedure with the desired actions and attach it to the click event:
def tidy_all():
    while 1:
        # refresh every 100ms
        rate(100)
        velocity = 0.05

        if purplebox.pos.z > 0.25:
            purplebox.pos.z -= velocity

        if bluebox.pos.x > 0.25:
            bluebox.pos.x -= velocity

        if yellowbox.pos.x > -0.25 and yellowbox.pos.z > -0.25:
            yellowbox.pos.x -= velocity
            yellowbox.pos.z -= velocity

        if orangebox.pos.z > 0 and orangebox.pos.x > 0:
            orangebox.pos.z -= velocity
            orangebox.pos.x -= velocity

scene.bind("click", tidy_all)
✅ And there you have it — the minimal working code for the project!
The full source code for the project is available [here]. (You can insert a link if you have one.)
I also added a feature that paints the container green when all the shapes fit inside, otherwise it turns red.

Early in my career, I specialized in the Python language. Python has been a constant in my professional life for over 10 years now. In 2018, I moved to London where I worked at companies of various sizes as a Python developer for five years. In parallel, I developed my activity as a Mentor, to which I now dedicate myself full-time.